Making a Pocketfold Invitation
Hello!
Welcome to my first post on the Coral & Slate Designs blog! So, I have been meaning to do this for ages but things have been BEYOND manic. My next blog will be more of an introduction to Coral & Slate Designs, what we do and how it all began. But today I want to show you how to make up your own pocketfold invitations.
I am planning to do another how to video about creating your artwork for these also, giving you some tips and tricks that I have learned along the way. But this had to come first as one of my budget-savvy brides requested that she make up her own pocketfold invitations so here we are...
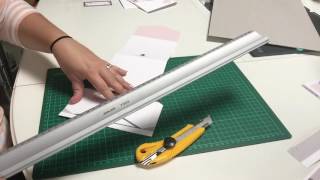
I have made a video explaining what you will need as well as showing you the various steps but, I have also written below the key points!
WHAT YOU WILL NEED!
§ A guillotine - at least A3 in size
§ A scorer
§ Scissors
§ A scalpel
§ Safety ruler
§ A self healing cutting board
§ Double sided tape - ideally (for your own sanity) not one with a peel back strip over the top
§ Hole punch (can be standard or I use a pair of Fiskars for a smaller hole)
§ Ribbon/String/Twine
STEPS
§ Firstly, using scissors, cut both tabs up along the straight and then inwards, across the diagonal line, to the invitation edge.
§ Secondly, use the scorer to make 5 folds; 3 across the invitation and two up along the edge of the invitation tabs. I would always recommend folding one to check that your folds are in the right place before folding all of them. Sometimes you have to move one of the score lines up or down a couple of millimeters to get the invitations to fold together cleanly.
§ Using your guillotine, ensuring that your invitations are as straight as possible, cut from the top, all the way down to the cut you made with the scissors. Do this on both sides.
§ While you have the guillotine out, cut the top diagonal lines to create the point that will be the front of your invitation.
§ Cut out your band as well as your inserts, cutting along the two side edges first, ensuring that the two (or three) inserts are exactly the same width. Then cut them across the top and the bottom. Put the band and inserts aside.
§ Using your scalpel, safety ruler and cutting board, cut the inward triangle on the pocket. For best results, I recommend starting from the middle and cutting outwards towards the edge. Use a firm fluid motion with a sharp blade to get the cleanest cut.
§ Snip the bottom diagonal lines of the tabs, (scissors of scalpel, whichever you find easiest) making the point in line with the scored edge - this means that the tab will not be visible when you fold it over.
§ Fold the two tabs inwards and then, put your double sided tape along the edges of the tabs. (The invitation should be the reverse side up when you are putting the tape on the tabs).
§ Flip the invitation over, turn in your tabs, and fold the pocket upwards. Make sure this is aligned with the invitations before sticking down.
§ You're in the home stretch now! Put your inserts into the pockets and fold along the remaining score lines.
§ Hole punch your bands at either side
§ Cut your ribbon, for this size of invitation, I always use a length of around 56/57cm. Cut the ribbon at an angle, this will stop it fraying and will make it easier for you to thread through the holes on the bands.
§ Thread the ribbon through the bands
§ Tie your banded ribbons around your pocketfold invitations
§ VOILA! You have done it!
Further info, hints & tips!
§ I would recommend creating at least one or two from start to end to get a feel for how everything all works as you will learn bits and pieces. Once you are happy, it is much quicker overall to do one process at a time; all the cutting, all the scoring, etc. but I do think it's worth doing a few to begin with.
§ Make sure you have plenty of time to get these done. I have made well over a thousand now (often with the help of my happy little helpers!) and I would say, on average, each one takes around 7 minutes. So if you have 100 invitations, that is 700 minutes! There are a lot of processes and none of them can be rushed. Also, you want to enjoy making your wedding invitations and that is only possible if you don't feel pressured by time. That is when mistakes happen too! If you are pushed for time, then I recommend making them up with 2 or 3 friends or family members, make a little production line and away you go! Friends & family members can be easily paid off with wine & compliments! ;)
§ Be as accurate as possible with your cutting and scoring. If the long initial cuts aren't quite straight or if your score marks aren't straight, this will show up a lot more once you start folding. I promise you will get a much better result for giving the invitation that extra time.
§ I always print 5 extra that what I need - partly for samples but also, especially for the first ones you're making - I promise you, you will make a little hiccup here and there. It is a pretty intricate process and so a lot of the time, a small mistake can show up quite strongly.